FAQs
Aliexpress Dropshipping and Fulfillment for WooCommerce
AliExpress is restricting access to their image links, causing external images/videos (via EXMAGE) to not display. If your images/video shows up like this via the external link:
-
- When your site tries to display an external image directly from an AliExpress link, the request is now blocked by AliExpress – causing images to break or go missing. This isn’t caused by your hosting, website settings, or our plugin, and currently can’t be resolved with any plugin workaround.
- Although there’s no official statement, AliExpress seems to be restricting access to their media – likely to prevent scraping or off-site usage.
- What to do: External links to AliExpress images no longer work reliably. The only solution is to download the image.
- As an alternative, you might consider uploading the file to a third-party CDN. That way, you won’t need to use your own server storage — just use the CDN link.
You can use the code below to achieve, please regard this instruction for where and how to add the code:
add_filter( 'dokan_get_dashboard_nav', function ( $urls ) {
if (! in_array( get_current_user_id(), [ 3, 6 ] ) ) {
unset( $urls['ald_settings'] );
unset( $urls['ald_import_list'] );
unset( $urls['ald_imported_list'] );
}


return $urls;
}, 20 );


add_filter( 'dokan_query_var_filter', function ( $query_vars ) {
if (! in_array( get_current_user_id(), [ 3, 6 ] ) ) {
unset( $query_vars['ald_settings'] );
unset( $query_vars['ald_import_list'] );
unset( $query_vars['ald_imported_list'] );
}


return $query_vars;
}, 20 );
Please add the user ID you want to accept/exclude from ALD settings. Keep/Remove the “!” from if (! in_array( get_current_user_id(), [ 3, 6 ] ) ) { (2 lines) to exclude/accept the ID
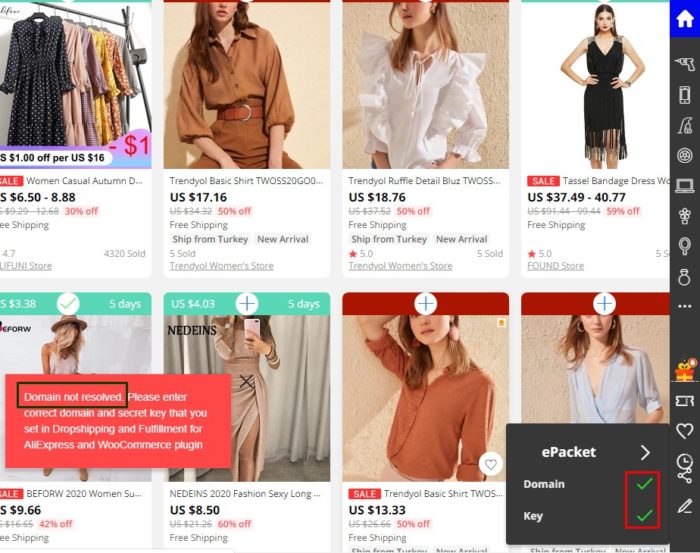
You are getting this error when domain and key status notification are accepted, but the “Domain not resolved…” notification repeatedly.
This problem is frequently caused by your security plugins on your website. There are 2 popular and frequent security plugins that users use for their website and face with error notifications when they import products from AliExpress. The following guides help you to solve the above question on WP Cerber Security, Antispam & Malware Scan plugin and Wordfence Security plugin.
1. WP Cerber Security, Antispam & Malware Scan
If you are using WP Cerber Security, Antispam & Malware Scan plugin, follow these steps
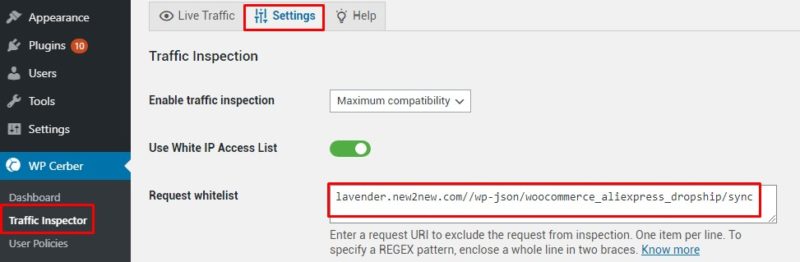
Step 1: Go to WP Cerber/ Traffic Inspector/ Live Traffic
You can see a list of requests including your requests to access Aliexpress importing pages that get the Forbidden errors.
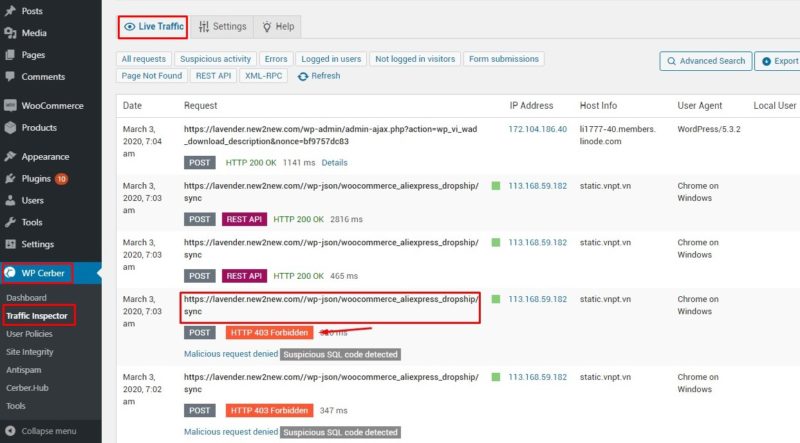
Step 2: Go to the Settings tab in Traffic Inspector to add your URL request to the request whitelist field.
- Enable use white IP Access List
- Add your URL request in the request whitelist field,
- Save the setting.
2. Wordfence Security.
If you are installing Wordfence Security, and stay “Enabled and Protecting” mode in the Web Application Firewall, just follow these steps:
Go to Wordfence / Firewall / Web Application Firewall. There are 2 ways to add your request URL on the whitelist.
The 1st way: Automatically add the request URL.
Step 1: Stay Web Application Firewall Status in Learning Mode.
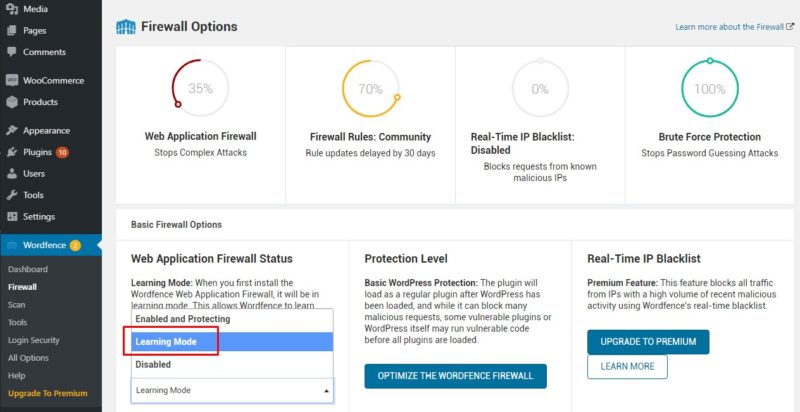
Step 2: Implement importing products from AliEpress.
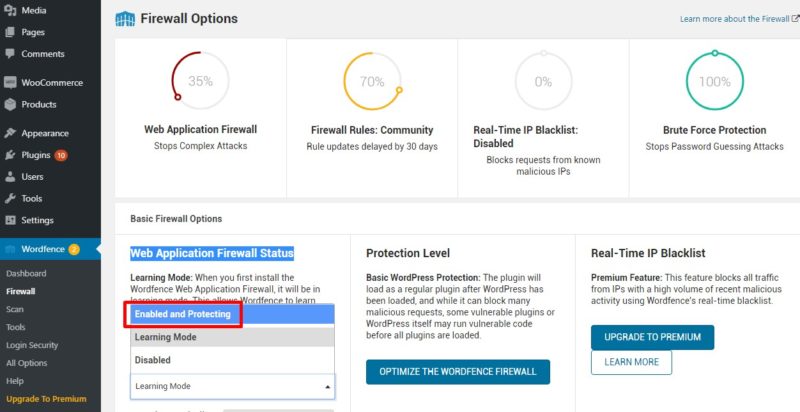
Step 3: Turn back to stay Web Application Firewall Status in Enabled and protecting mode and save.
Step 4: Take a look at the whitelist URLs table, your recent request URL is whitelisted automatically.
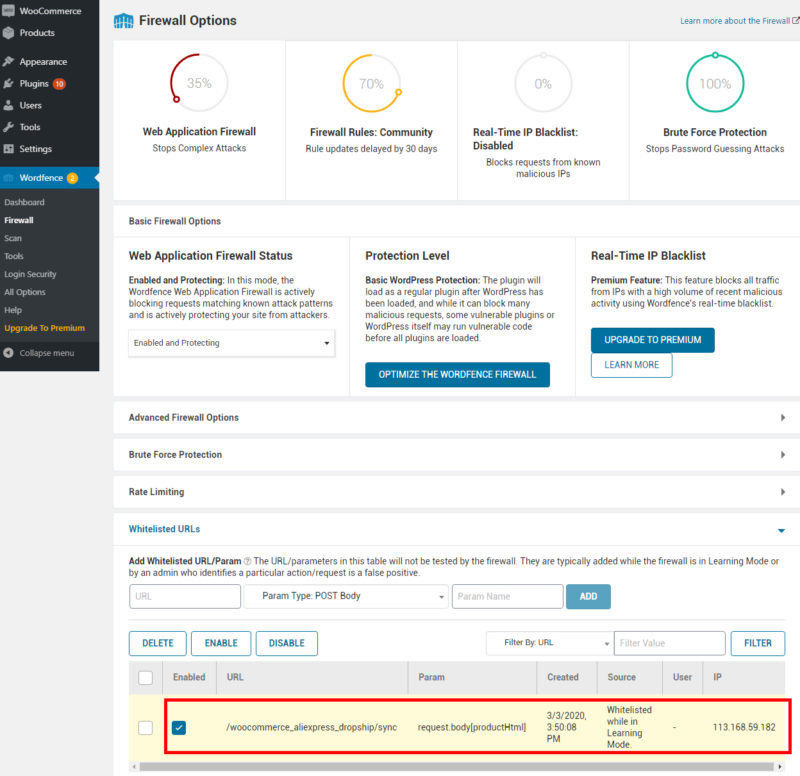
The 2nd way: Manually add the request URL to the whitelist.
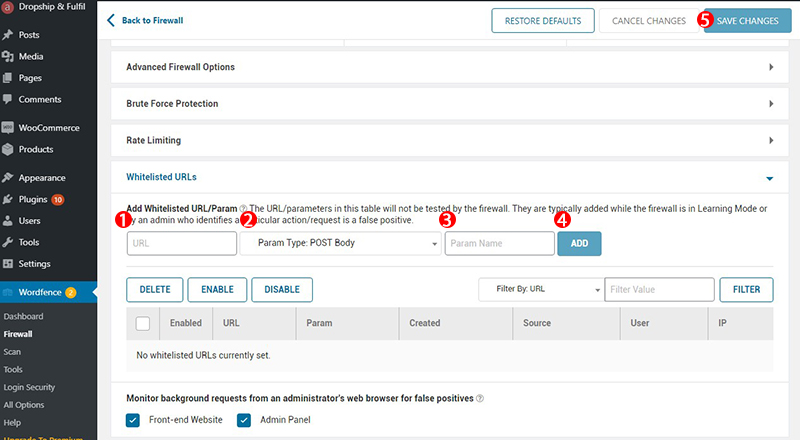
1. URL: add this URL
2. Param Type: stay POST Body /woocommerce_aliexpress_dropship/sync
3. Param Name: add this name productHtml
4. Add: to add this URL
5. Save.
** Note: With other FireWall plugins, try to find out how to whitelist your request URL in those FireWall plugins and import products from AliExpress normally.
If you want to transfer data (Aliexxpress products, orders, settings) among sites, you can follow these hints:
a. Transfer products
You can follow this FAQ: How to transfer Aliepxress products among WooCommerce Stores
b. Transfer the settings
You can read this Transfer setting guide.
c. Migrate the whole site
You can install this plugin: Duplicator – WordPress Migration Plugin
Bulky - WooCommerce Bulk Edit Products
Q: What are the common causes of Bulky-Loading Errors and Saving Settings issues?
A: There are two common causes that may lead to Bulky – Loading Errors and Saving Settings problems:
1. Conflict with 3rd Plugin:
-
- One possible cause is a conflict with a 3rd party plugin installed on your website. This conflict can occur when the 3rd plugin’s JavaScript interferes with our plugin’s functionality or when the hooks used in the save product processing toggles are being enabled for the 3rd plugin, but the 3rd plugin lacks the required data.
-
- To troubleshoot this issue, we recommend disabling other plugins one by one to identify if there is a conflict. If a conflict is found, consider reaching out to our support forum for assistance or exploring alternative solutions. Or disable All options for Hooks in save product processing (See the image below).

2. A large Amount of Data:
-
- Another cause for Bulky – Loading Errors and Saving Settings issues is having a large amount of data on your website. This can include a high number of products, Orders, or Coupons that needs to be processed.
- When there is a significant amount of data, it can put a strain on server resources, resulting in slow loading times or errors when attempting to save settings.
- To address this issue, please decrease the number of products/orders/coupons per bulky editing page.
Please note that these are general explanations, and the specific cause of the issue may vary depending on your website’s configuration and other factors. If you continue to experience problems, we recommend contacting our support team for further assistance.
Envato
To use the auto-update feature of VillaTheme plugins, you will have to fill in your Envato Purchase Code in Update Tab.
To find your Envato Purchase code,
- At first, please visit CodeCanyon.net and log in your Envato account.
- Hover the mouse over your username at the top of the screen.
- Click ‘Downloads’ from the drop-down menu.
- Find the plugin you need its purchase code and then click ‘License certificate & purchase code’ (available as PDF or text file).
Envato purchase code example:

Watch this video for a very detail guiding “How to find my Envato Purchase Code”
All of our products on Envato are using Split license, not GPL license; so, each regular license can be used for only one site. You will need to purchase more license to use for more sites.
After you renew or extend your item support, you can access our Support Forum and create your support ticket, to receive our support/assistance for technical issues, or questions while using our plugins.
To keep using the Auto-update feature, that makes your plugin update automatically, you need to re-authenticate your license on our system, to get the key to update the plugin.
Follow this instruction to re-authenticate and enable the Auto-update feature.
S2W Shopify to WooCommerce
Numerous customers face challenges with product inventory when using S2W Migrate to transfer data from Shopify to WooCommerce. Specifically, they notice that there is no inventory in stock after completing the migration to WooCommerce.
This issue often arises due to a particular setting within WooCommerce, which needs to be configured before initiating the data migration.
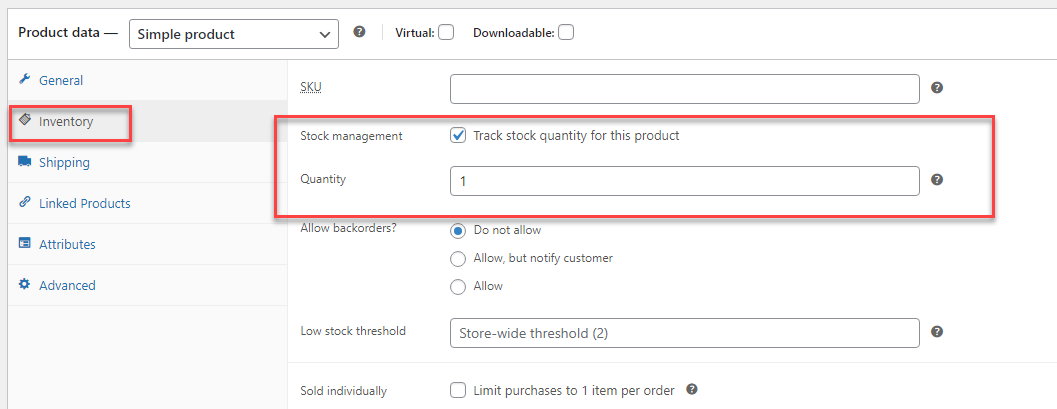
We suggest that the “Stock management” checkbox for products is checked before commencing the migration process to avoid encountering this problem.
How does WooCommerce Inventory management function?
WooCommerce inventory management helps you monitor your product quantities and sales. This functionality is included as a default feature in WooCommerce. While there are both free and premium plugins available to enhance this feature, the default options should suffice for most WordPress-based e-commerce websites.
To set up WooCommerce inventory, follow these steps:
1. Navigate to WooCommerce > Settings > Products > Inventory in your WordPress admin area.
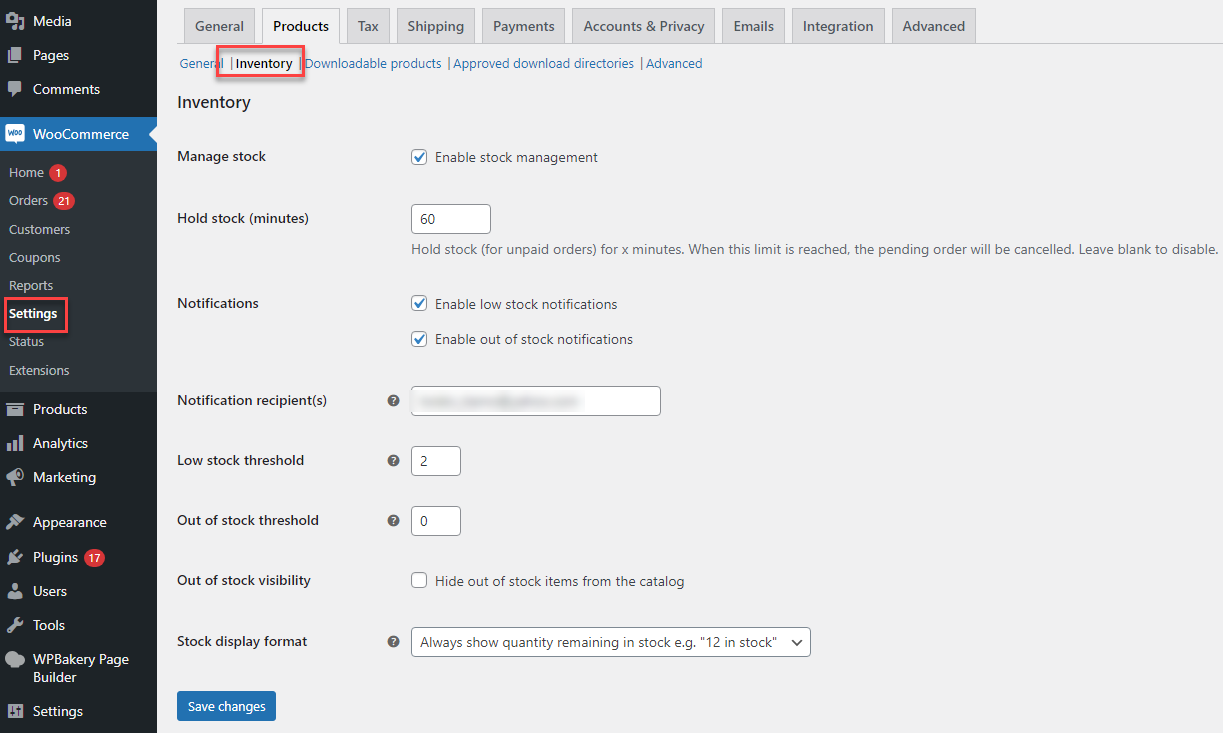
Ensure that the option for “Enable stock management” is checked.
How to manage a variable product’s variable stock status
Repeat these steps for each variation of the variable product that you want to manage the stock status. A variable product in WooCommerce refers to one that differs from the original listed product. With WooCommerce, you can control the stock status of each variation individually. For instance, if you offer a shirt in multiple sizes and colors, you’ll need to specify the stock quantity for each size and color variation separately.

If you’ve already completed the data migration without activating the stock management feature, simply navigate to the WooCommerce Products section and synchronize the inventory. This action will ensure that your inventory is properly updated and aligned with the products migrated from Shopify.
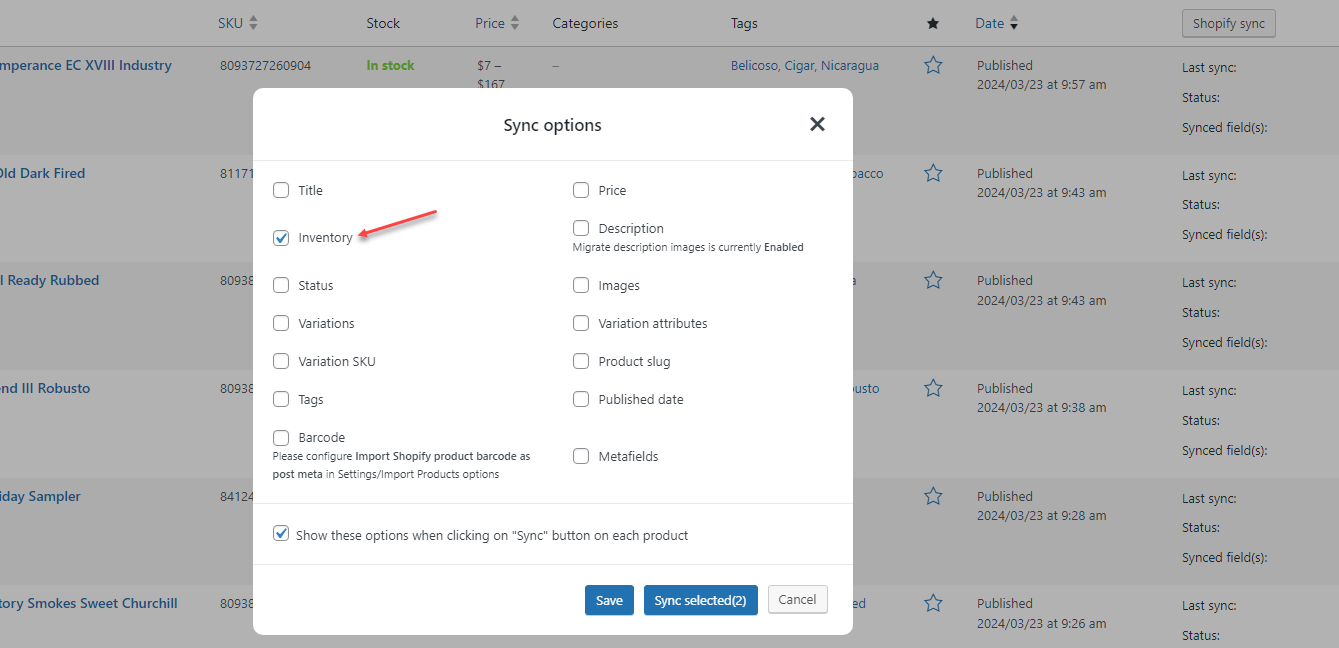
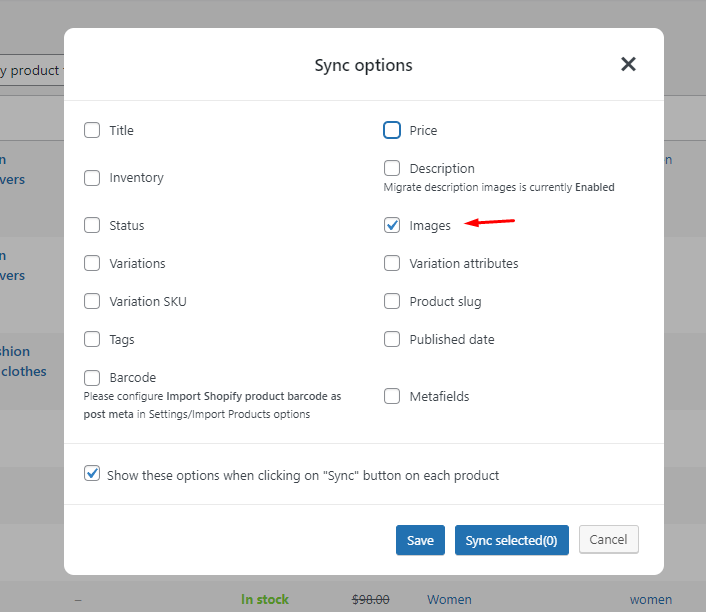
You can refer to this part of our documentation to sync Shopify product data.
Importing images and gallery images is a background process, which means errors may not be displayed directly. To identify any issues, we need to investigate the site access.
What are the common causes of problems with importing product images and image galleries?
The problem can be caused by various factors. Here are some common causes.
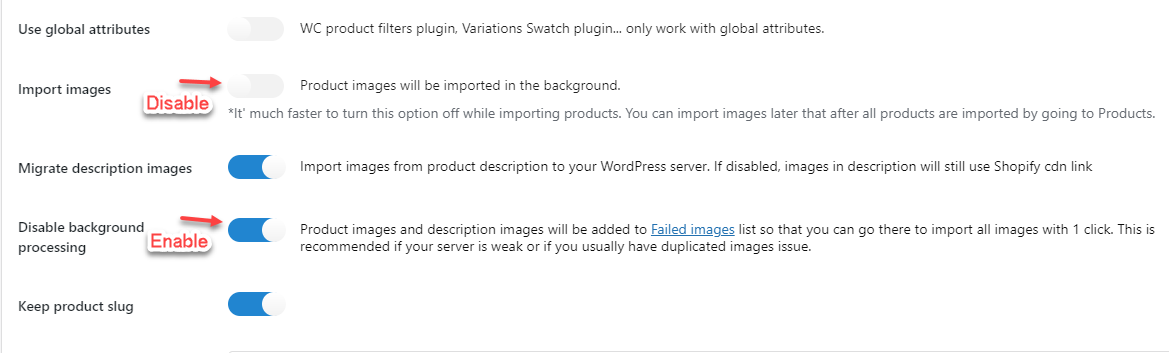
- A large number of products or variation products: If the server does not have sufficient strength to handle the importing process due to the data size, it can lead to issues. To solve this, we recommend disabling Background processing and importing product images from the Failed image section.
- Missed tables during plugin installation: In some cases, during the initial installation of the plugin on the website, certain tables in the plugin’s database may be missed. Deactivating and reactivating the plugin, then syncing the images from the product list page can resolve this issue.
- Cron job not working: If the Cron on the site is not functioning properly, it can affect the importing process. We may need to check the cron job and require site access to resolve this issue.
- Unsupported image formats: Some image formats, such as Gift images or non-existent images on Shopify, may not be supported for import.
How to solve the problem of importing images when encountering a large data size issue?
To resolve this issue, we recommend disabling Background processing and importing product images from the Failed image section.
Step 1: Go to the Import Product Options, disable the Import Images option, and enable the Disable background processing option.
Disable the background processing and save images in the Failed images
Step 2: Go to Shopify to Woo > Failed Images, then download all or (a/some) images you want
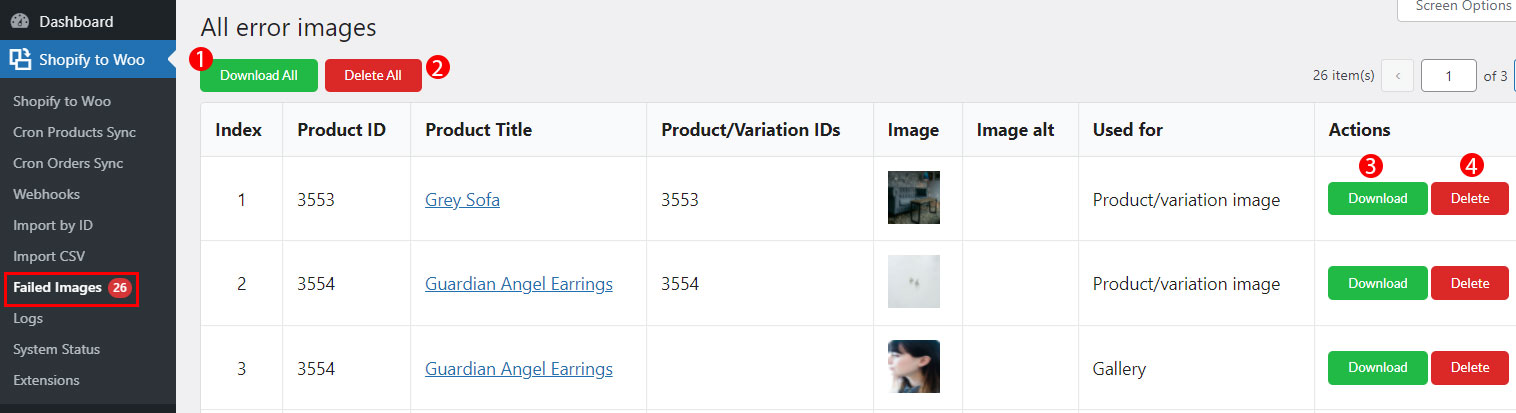
Failed images section
You can also increase the number of products per page on the failed images page

In a ticket from the customer, we discovered that two tables were missing in the plugin’s database during the initial installation. The customer successfully resolved the issue by deactivating and reactivating the plugin, navigating to the product list page, and syncing the images.
Why do we need site access to investigate and resolve the issues?
Site access is necessary for us to investigate and identify the specific causes of the problem. It allows us to check the cron job, database, and other relevant configurations. We rely on our customers’ assistance in identifying and resolving different cases and ensuring a smooth importing process.
In many cases, when customers import the data, somehow it has not been imported, but when we check, reimport, or sync, the data is right totally imported normally.
If you have any other questions or encounter different issues, please provide us with the necessary site information, and we will be glad to assist you further.
WooCommerce and WordPress Lucky Wheel
You are using WooCommerce Lucky Wheel or WordPress Lucky Wheel, you don’t want the lucky wheel to appear in popup type, let customers click on the “Lucky Wheel” button, the wheel will show up instead. This job can be achievable with some simple steps below:
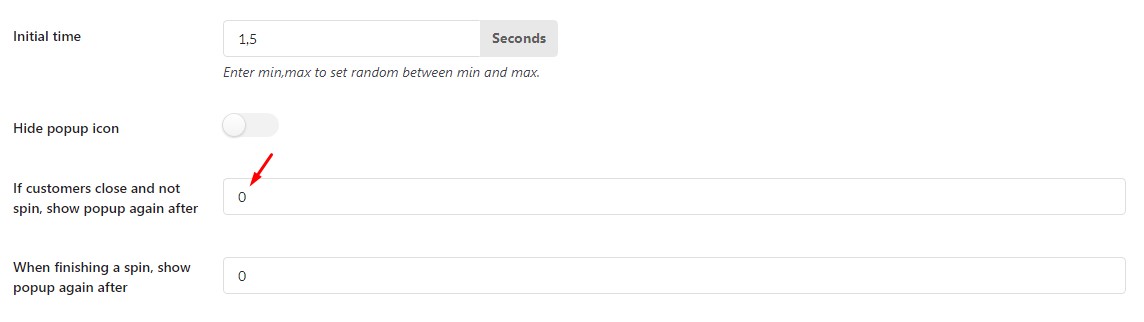
1. Configure the Lucky Wheel plugin.
In the Pop-up tab of this plugin setting, set the option “If customers close and not spin, show popup again after” to: ‘0’
2. Create a lucky wheel button on pages you want.
+ From your Dashboard > Pages, go to pages which you want to show the “Lucky Wheel” button.
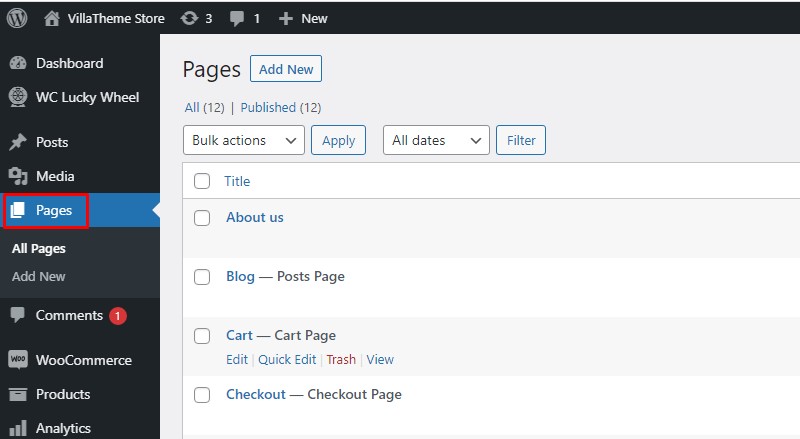
+ Create a “Lucky Wheel” button.
Add a new block on the page, then create a button.
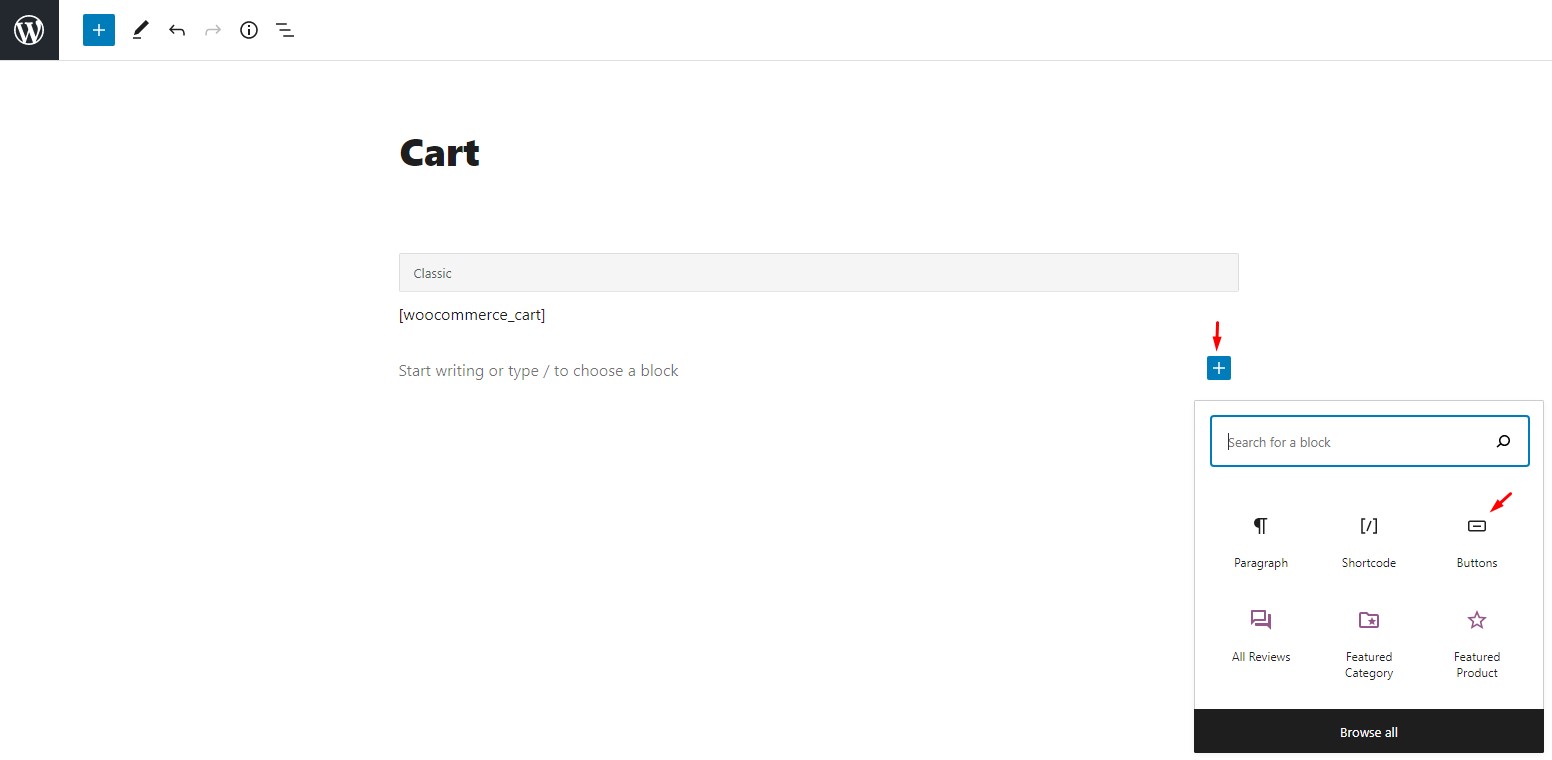
+ Type button text
+ Click on the button, go to the “Block” section on the right side, go to the Advanced > Additional CSS class(es), add this class below and save the settings.
woocommerce-lucky-wheel-popup-icon for WooCommerce Lucky Wheel plugin.
wordpress-lucky-wheel-popup-icon for WordPress Lucky Wheel plugin

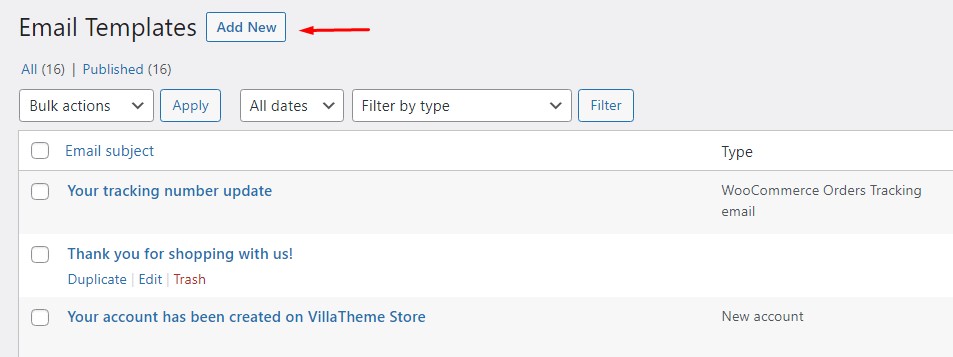
WooCommerce Email Template Customizer
If you’re using an order tracking plugin, and this plugin has a function to attach the tracking info in WooCommerce order emails, these tracking info is the additional info. You can attach these info to email templates created by our plugin WooCommerce Email Template Customizer. Here’s the full instruction for additional info in general.

Basically, WooCommerce email notifications are not available with the tracking information in the orders notification emails. In fact, as a shop owner, you are aware of how important tracking information is in the orders, which allows to inform customers about their shipment journey. For this purpose, this article presents how to display tracking information in the orders email templates of the WooCommerce Email Template Customizer plugin
We thought about this problem and released the WooCommerce Email Template Customizer plugin, which offers a lot of amazing features including letting show the email contents of a 3rd plugin in general and the tracking information of a 3rd orders tracking plugin in particular. So, what is that feature?

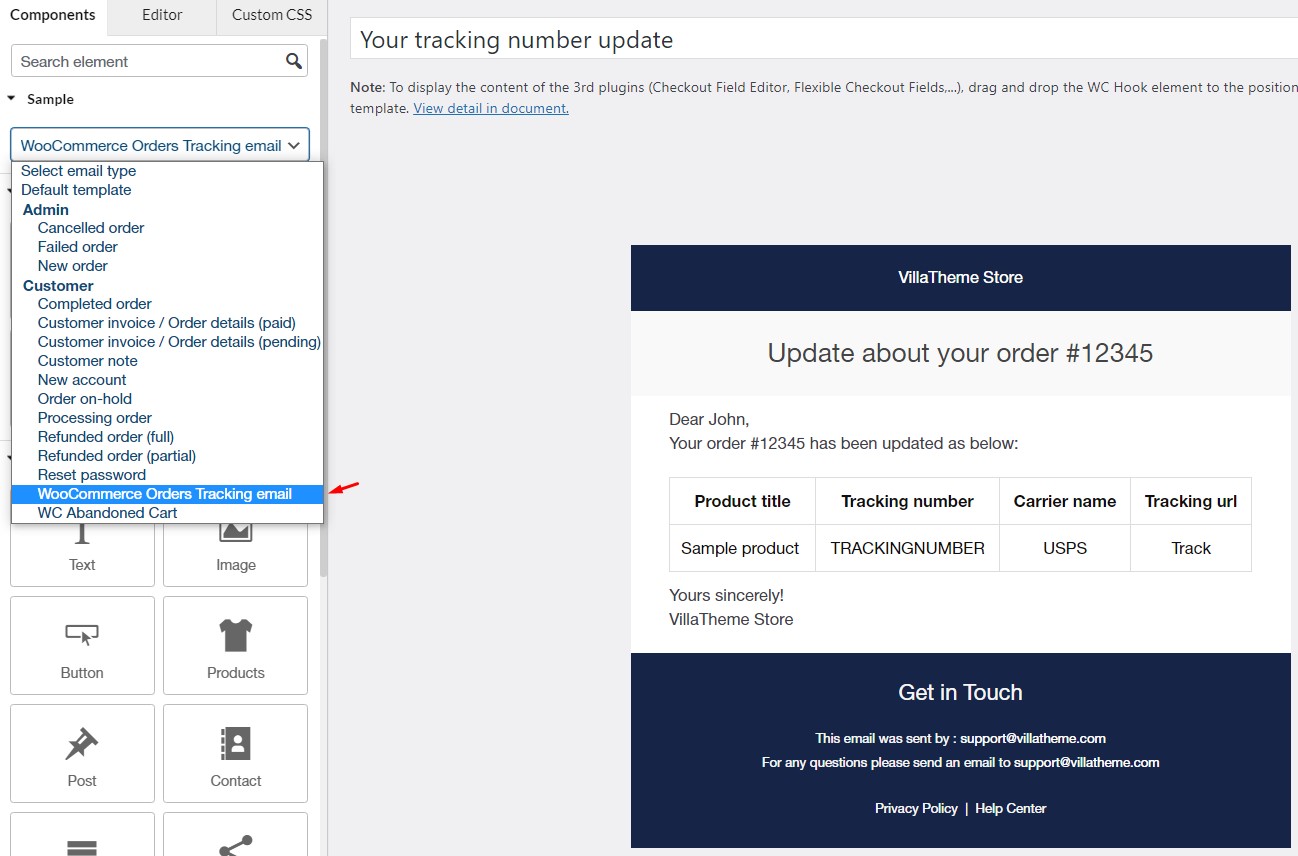
WC Hook element is integrated to the email that allows you to insert custom code at points wherever the hooks run. If you want to display the content of the 3rd plugins, just drag and drop the WC Hook element to the position which you want to display in the email template. In particular, there are 3 hook positions, you can choose with this plugin: Before order table, After order table, Or order meta hook, just click on the element to switch among these positions.
With the WC Hook element, displaying tracking information for orders will be easier and more effective with the following steps:
1: Install a 3rd orders tracking plugin and the WooCommerce Email Template customizer plugin.
2: In the WooCommerce Email Template customizer, go to an order email template that you want to show tracking information, drag and drop the WC Hook element to the position where tracking info of the orders tracking plugin presents (before/after the order table) and save the settings.
3: Add tracking for the order, then the tracking info should be shown in our email template plugin.
You can see this video on how to use the WC Hook element of the WooCommerce Email Template customizer plugin:
It is more amazing when we have the WooCommerce Orders Tracking plugin that is made compatible with the WooCommerce Email Template customizer plugin, thank that tracking information is displayed professionally with flexible positions in email templates.
Particularly, there are 2 ways to show orders tracking information on the email templates of WooCommerce Email Template customizer plugin by WooCommerce Orders Tracking plugin:
+ The first way: Display tracking info in WooCommerce emails.
+ The second way: Display tracking info in the own tracking email of the WooCommerce Orders Tracking plugin.
A. Display tracking info in WooCommerce emails.
![]()
![]()
1: Activate WooCommerce Email Template customizer plugin and WooCommerce Orders Tracking plugin (premium required)
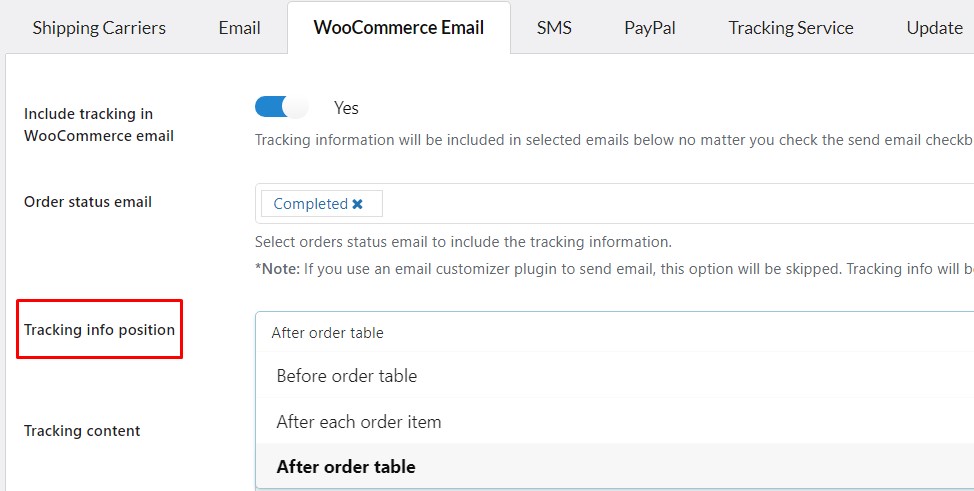
2: Go to Orders Tracking setting > WooCommerce Email.
3: In the Tracking info position option, select the position to show tracking info in WooCommerce emails, they can be: After each order item; Before Order table; After Order table.
4: Test the order and see the coming email.
B. Display tracking info in the own tracking email of the WooCommerce Orders Tracking plugin.
![]()
![]()
![]()
![]()
Step 1: Build order tracking email templates in the WooCommerce Email Template customizer plugin.
Build unlimited order tracking email templates using layouts and elements of WooCommerce Email Template Customizer, and shortcodes designed uniquely for WooCommerce Orders Tracking. You can read how to build email templates here, how to customize available email templates here .
Step 2: After building an order tracking template, save that email template under the “WooCommerce Orders Tracking” type.
Step 3: Select a created template in the WooCommerce Orders Tracking plugin.
Go to Orders Tracking > Email, in the Email template option, select a created template.

Step 4: Test the order and see the coming email.
You can see this video on how to build and customize the tracking email of WooCommerce Orders Tracking by WooCommerce Email Template Customizer.
If you are using the WooCommerce Email Template Customizer, and the emails you customized are not sent at all, please make sure you have checked those possibilities below:
- Make sure the emails are sent successfully without our plugin activated.
- If the emails are sent successfully with our plugin deactivated:
-
- Check again with only WooCommerce and our plugin. If the issue disappears when there’s only WooCommerce and our plugin, there’s a conflict with a 3rd party.
- The issue remains, in this case:
- Please check the current SMTP configuration on your server.
- Let us know by creating a ticket on our Support Forum, following this instruction. Or contact us by email. Our email address: support@villatheme.com
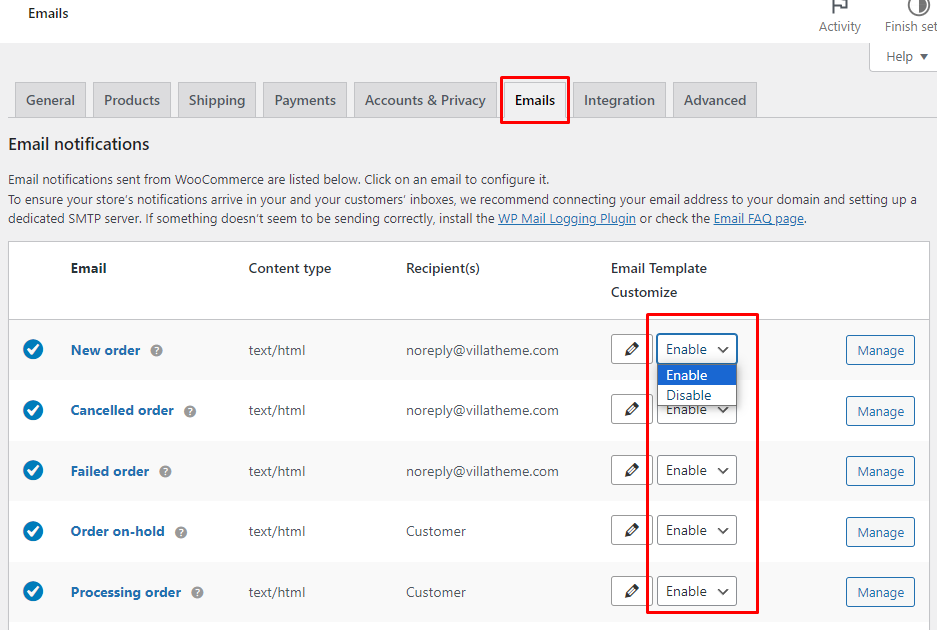
You spent hours customizing email templates, but you realize the emails sent to the admin/customers are not the templates you customized. Here is our suggestion:
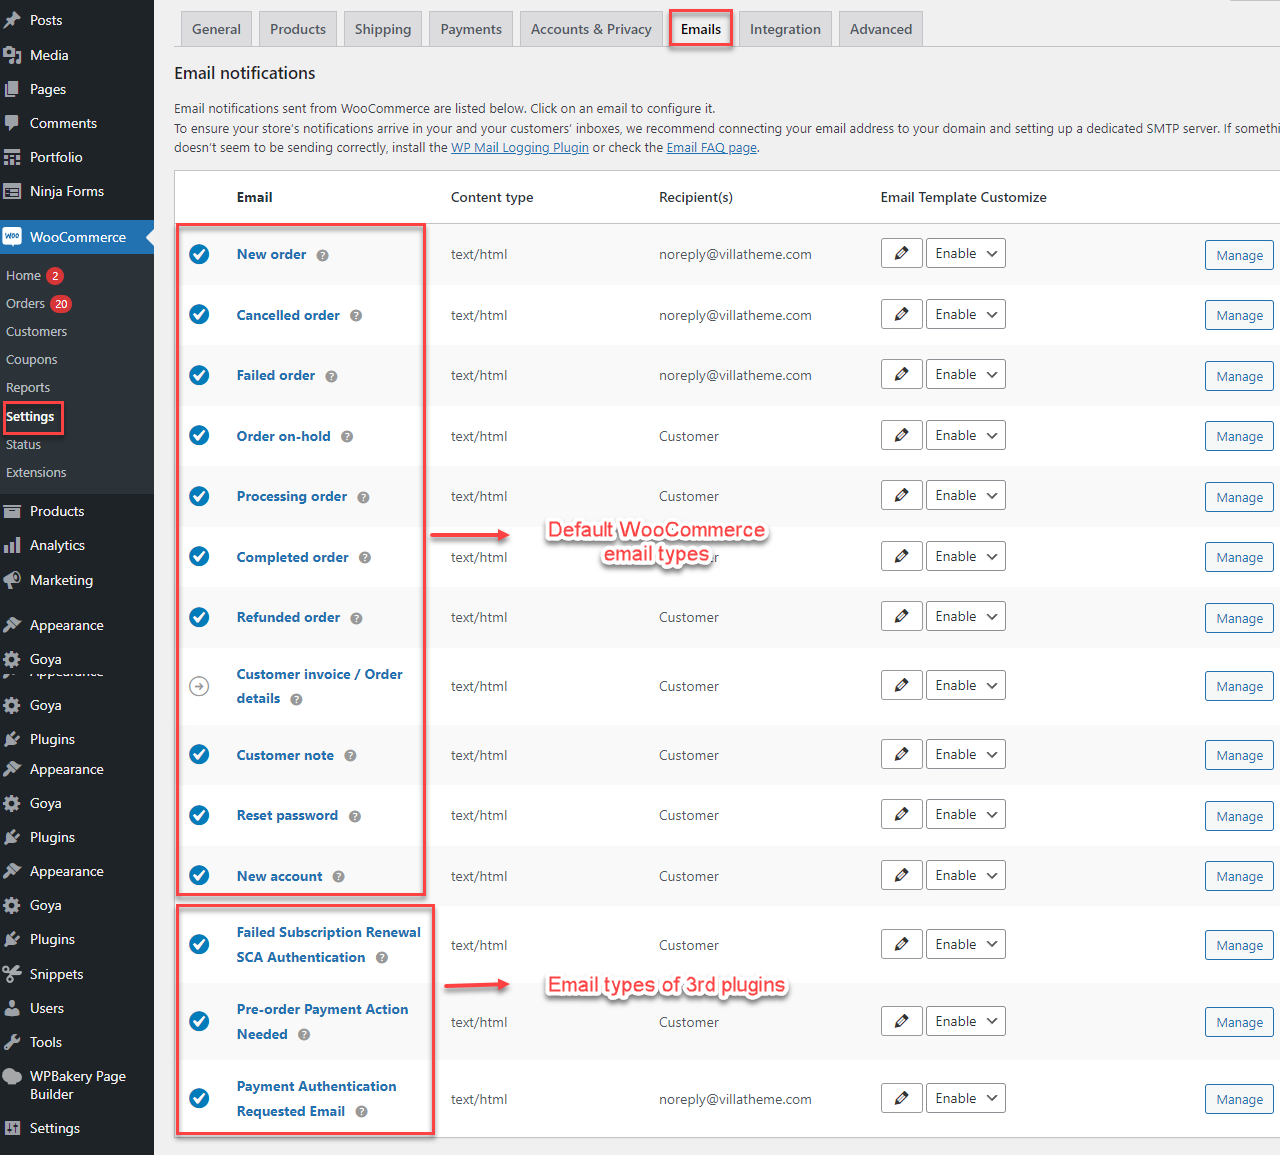
Go to WooCommerce > Settings > Choose the Emails tab. Here you see a list of all email types. Select the Edit button as in the image below.

You’ll be redirected to the template that is used for this email type. Check if the template you design is here. If not, go to edit the email template and assign the template again in the Advanced options, as in the image below:
The WooCommerce Email Template Customize plugin empowers you to tailor the appearance of your standard WooCommerce emails, ensuring a personalized and professional touch in your communication with customers. However, in certain instances, you may encounter a discrepancy where the email templates sent do not align with your intended customization. To address this challenge, it is crucial to explore the underlying reasons behind such occurrences.
1. The first reason: Disable utilizing the email templates.
Our plugin offers the function to use or not the email templates of the plugin, and alter the default WooCommerce Emails. In this case, please check if you disable using our email template options, the email will not go through our email template.
Go to WooCommerce > Settings > Emails:
2. The second reason: Choose the wrong email type.
Assigning a type for the email is the first step when you customize an email template. If you use the available default templates, they have been assigned the correct email type.
However, if you create a new email template, you must pay attention to assigning the correct email type. It is noted that the email type can be assigned or changed to 2 positions:
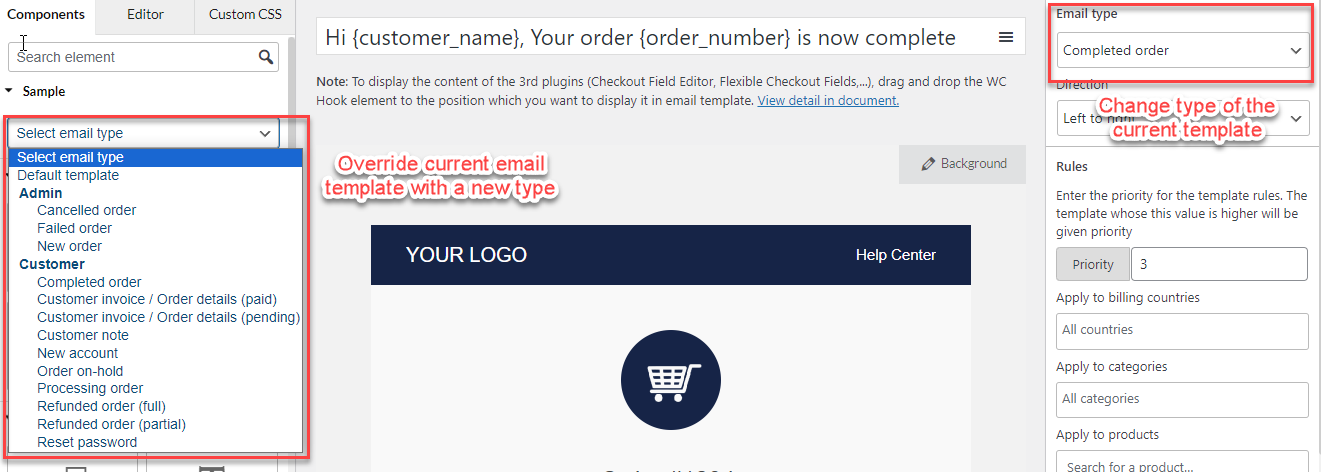
3 The email is not the WooCommerce email type.
Our plugin supports customizing WooCommerce email types. Go to WooCommerce > Settings > Emails, you can see the list of WooCommerce email types.
Default WooCommerce email types in the WooCommerce email list are available with default templates in our plugin, providing the components and options to customize them for your specific needs.
For third-party plugins in the WooCommerce email list, their email types can be integrated into our plugin by creating new email types. You can follow this article the 3. Creating new email types by the 3rd plugin.
However, if a third-party plugin’s email type does not appear in the WooCommerce Email list, it signifies they are not integrated into WooCommerce email. In such instances, these emails will not run through our email templates.
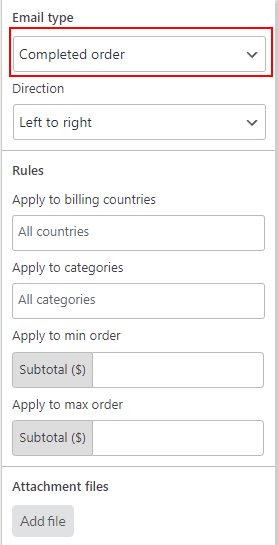
4. Rules are set in the templates
In the premium version, our plugin offers rules for specific templates, these rules will let you control which template is sent in different conditions.
If the conditions are not met, the right expected templates will not be applied to send out.
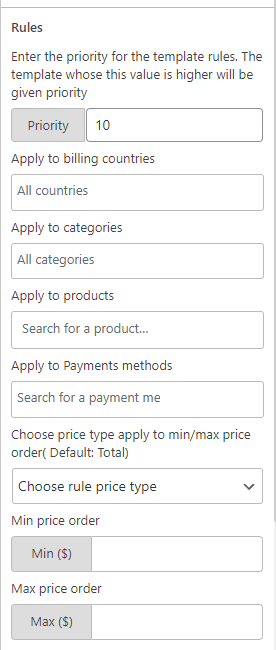
Priority: In case you have 2 templates with the same rules, one with the higher given priority will be sent
Rules for languages: This rule only appears once you use a multilingual plugin (WPML, or Polylang). With this rule, you can create several templates and assign them to different languages.
- Apply to languages: Select the language(s). This template will be sent when the triggered action is done in the selected language(s)
The rule for billing countries
- Apply to billing countries: Select the countries. The template will be sent when the user’s billing country is one of the selected.
Rules for transaction email: These rules will be available for WooCommerce transaction emails – New order, Failed order, Cancelled order, Order on hold, Customer invoice/Order details (both paid and pending), Processing order, Completed order, and Refunded order (both full and partial).
- Apply to categories: Select the categories applied to this template. When the user makes an order with items belonging to these categories, the template will be sent.
- Apply to products: Select the products applied to this template. When the user makes an order with these items, the template will be sent.
- Apply to payment methods: Select the payment methods applied to this template. When the user makes an order with these payment methods, the template will be sent.
- Choose the price type that is applied to min/max price orders: Select the price type to apply this template, they can be Order subtotal or order total.
- Apply to min price order: Add the minimum order subtotal. Once the order reaches this minimum amount or higher, the template will be sent.
- Apply to max price order: Enter the maximum amount for the order subtotal. The template will be sent when the user makes an order with the subtotal lower or equal to this value.
We understand the importance of ensuring smooth communication with your customers, particularly through email notifications. Allow us to provide clarity on our plugin’s involvement in this process.
1. No direct relation:
Our plugin is designed to enhance the customization of default WooCommerce Emails. Basically, the function of sending WooCommerce emails is not within the scope of our plugin’s capabilities. Typically, WooCommerce emails are automatically dispatched when there is a change in the order status.
2. Potential relation:
However, it’s essential to consider the impact of customized email content generated by our plugin. If your emails contain a significant amount of HTML code, there is a possibility that they may exceed the limitations of your server’s email content. This could potentially impede the successful delivery of your emails to your customers.
In such cases, we recommend the following solutions:
- Install and utilize a mail log plugin to monitor email activity on your website. By performing test orders, you can determine whether emails are being sent from your site effectively. You can find detailed instructions on this process in our article.
- Additionally, consider employing an SMTP plugin to handle the sending of emails from your WordPress site. This guide provides step-by-step instructions on configuring an SMTP plugin for optimal email delivery.
We hope that implementing these solutions will resolve any issues you may be experiencing with email delivery. However, should the problem persist or if you require further assistance, please do not hesitate to reach out to us on our support forum. We are committed to ensuring the seamless operation of our plugin and are here to support you every step of the way.
WooCommerce Product Variations Swatches
It’s managed by the “Change product images” option in every attribute settings.
- Not change: Product image does not change after selecting attribute.
- Change to image set for the attribute: There must be attribute images, and no variation images. Otherwise attribute images will be taken the priority by the variation images.
- Auto detect variation image: When users click one attribute term, plugin detects the variation including that selected attribute and shows the variation image.
If the image does not change how you want it to, it could be settings issue that the “Change product images” option was assigned in the incorrect attribute. You can visit “Why don’t swatches change like configured in the back end?” article for how to check further.
Gutenberg blocks are the editor blocks that are used to create content layouts in the new WordPress block editor aka Gutenberg.
Some Gutenberg blocks for WooCommerce like “Hand-picked Products”… If you use these blocks and can’t display variation swatches there, you can use this code below following this instruction for how and where to add the code.
if ( class_exists( 'VIWPVS_WOOCOMMERCE_PRODUCT_VARIATIONS_SWATCHES_Frontend_Loop_Product_Swatches' ) ) {
	add_filter( 'woocommerce_blocks_product_grid_item_html', function ( $html, $data, $product ) {

		if ( $product->get_type() === 'variable' ) {

			$attributes = $product->get_variation_attributes();
			if ( $attributes && $count_attrs = count( $attributes ) ) {
				$VIWPVS = VIWPVS_WOOCOMMERCE_PRODUCT_VARIATIONS_SWATCHES_Frontend_Loop_Product_Swatches::instance();
				ob_start();
				$VIWPVS->get_loop_attribute_option_html( $product );
				$show_option = ob_get_clean();

				return "<li class=\"wc-block-grid__product\">
				<a href=\"{$data->permalink}\" class=\"wc-block-grid__product-link\">
					{$data->image}
					{$data->title}
				</a>
				{$data->badge}
				{$data->price}
				{$show_option}
				{$data->button}
			</li>";

			} else {
				return $html;
			}
		}

		return $html;
	}, 10, 3 );
}
It’s the “Disable ‘out of stock’ variation items” option – in the Swatches on Single page settings for swatches on single product page; and in the Swatches on Product List settings for swatches on product list (Shop page, category page…)
It’s managed by the “Out of stock” option in each swatches profile, mentioned in this documentation.
- Do not change: The out-of-stock variation and/or unavailable combination looks totally similar to normal ones. No changing.
- Hide: Hide the out-of-stock variations and/or unavailable combinations
- Blur: Blur the out-of-stock variations and/or unavailable combinations
- Blur with icon: Make the out-of-stock variations and/or unavailable combinations blurred and there’s a red cross inside the swatches.
Normally, there are 3 common cases for this issue:
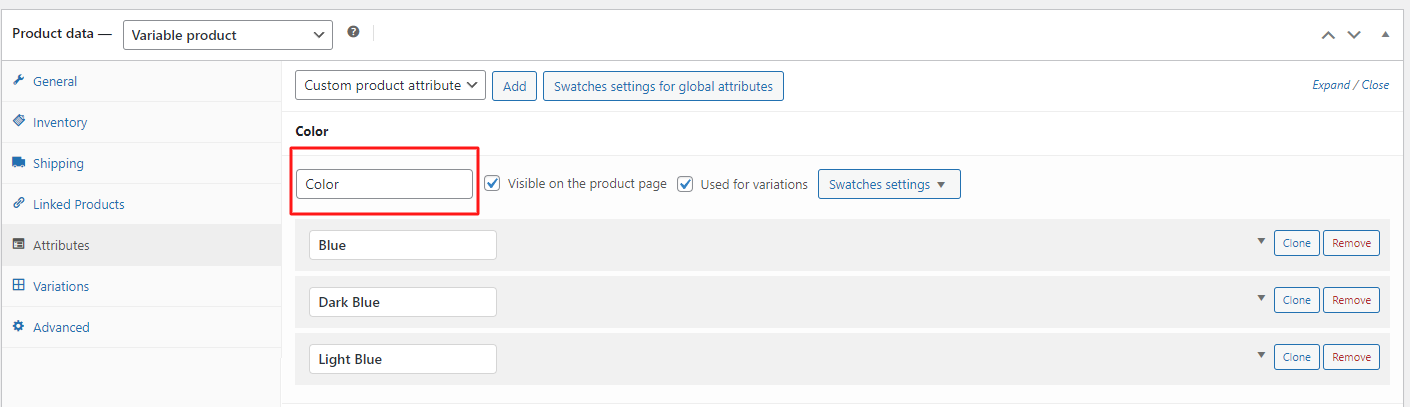
1. Check if the settings you’re configuring is for Global or Custom attribute
Global and Custom attribute could be confusing sometime. One tip to know an attribute is custom or global, is to view their title in the product data. If the title can be edited, it’s the custom attribute.
Global attribute title can not be edited.
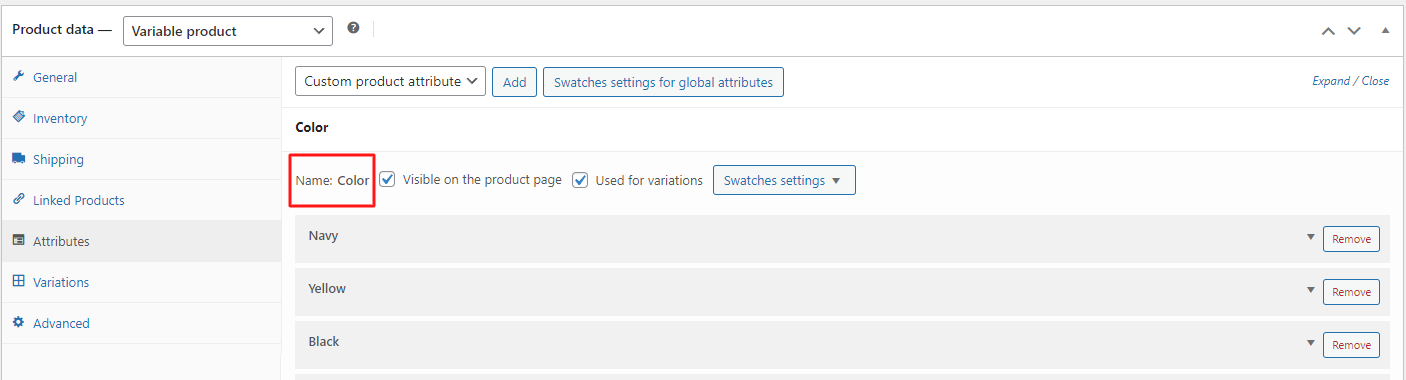
Custom attribute title, as well as the term title, can be edited. Also there’s a “Clone” button in each term
2. Global Attribute but assigning custom settings
The attribute is global, but you configured these settings
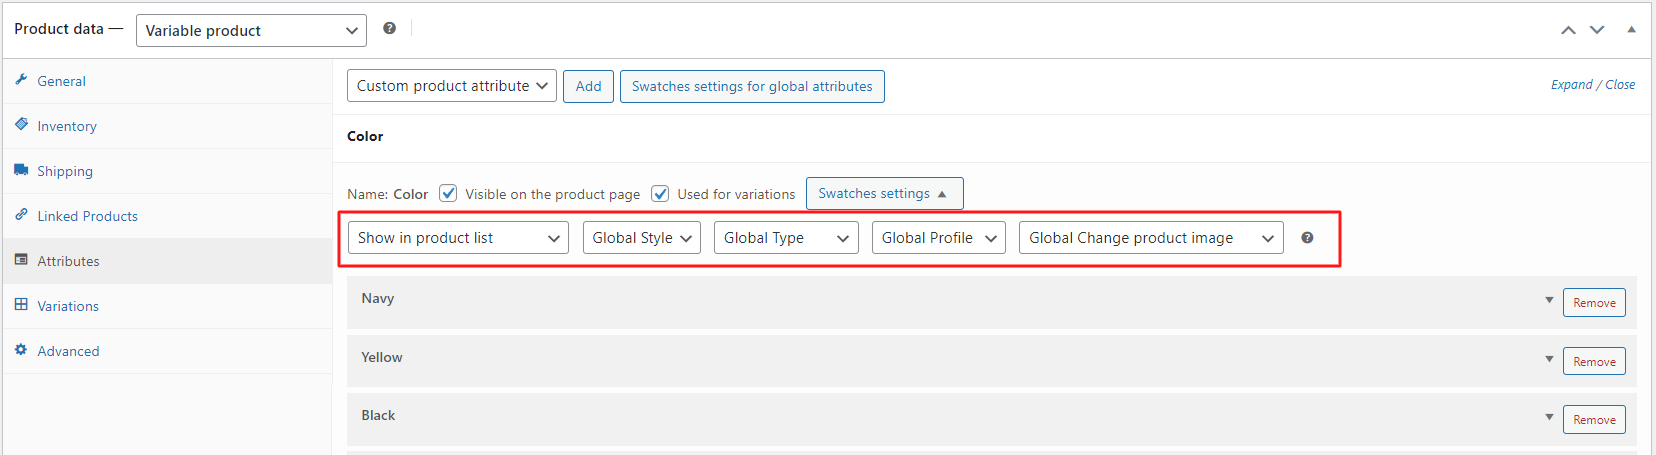
These configuration in the product data will apply to only that product, it takes the highest priority
If one option is not “Global” here, that attribute no longer inherits Global Attributes settings.
Same goes for the Custom Attributes, if one option is not “Global” here, that custom attribute no longer inherits Custom Attributes settings.
3. Compatibility issue
If 2 cases above are not your case, there’s likely a conflict. We recommend following this documentation of WooCommerce to test.